Client
Under construction
Client Cvars & Commands
Excessive Plus has several new client cvars and commands, as well as some modifications to existing ones, which accounts for its many server side features. In this document you will find them all.
Variable list
com_maxfps
- Sets a cap of FPS that you Q3 client will not exceed. Maximum FPS is 125.
com_hunkmegs
- Sets a number of Megabytes (mb's) that your Quake 3 Client can use to load maps. Some maps need more memory. Maximum number is 128. Default is 56mb
r_displayrefresh
- Sets your Display Refresh rate in Quake III. Do not exceed the Display refresh rate your monitor can handle. If you do not know what Display refresh rate your monitor can handle, do not use this command.
cl_timeNudge
- This affects how your client processes the snapshots it receives.Normally the client compares one snapshot with the next and interpolates between the two.If you set this to a negative value, you can adjust the interpolation of snapshots to compensate for lag.The more negative timenudge you use, the more unsmooth other players will appear, but the less latency you will have.The hardcoded limit is between -30 and +30.You can use positive values of timenudge to affect snapshot interpolation with an opposite effect, making the game much smoother, although deliberately delayed.Timenudge only directly affects the latency of the incoming data and does not directly affect the data that you send to the server.
- A tip for using timenudge. If you are losing packets try adjusting timenudge until you get a thin blue line on your ping graph, at this setting it should give the feeling of a more smooth connection but just at the point where anymore nudge would be creating undesired prediction side effects and less timenudge, packetloss. Try to think of timenudge as a command which allows you to better sync yourself (when your connection is constantly bad) to a sever.
cg_cmdTimeNudge
cg_drawBBox
- Draws the enemy hitboxes on demos
cg_shadows
- Changes type of shadows: 0 - disable shadows; 1 - simple round shadows; 2 - figured shadows
cg_gibs
- Enables and Disables enemies blowing up and parts of them flying around
cg_drawrewards
- Enables and Disables the notification of Rewards
cg_marks
- Removes marks, bullet holes, scratches and weapon fire effects from all terrains. Increases FPS
cg_drawfps
- Enables and Disables a HUD text that shows you how much FPS your Q3 Client has
cg_projectileNudge
- set to your average ping (this means also that you may need to change this value after you change server, to maintain the best experience). Default value is 0.
cg_projectilenudge is the new method of reducing lag and is compatible with delagged gameplay. When set correctly it enables you to assess when incoming projectiles are going to hit you in spite of your lag, enabling you to dodge them. It should be set to your average ping time (not half your ping like cl_timenudge). This enables a client prediction algorithm also, but for projectiles only and not for targets so you can hit them with delagged hitscan weapons.
Note that it is possible to use cl_timenudge together with cg_projectilenudge, but calculating to which values you should set them together is not intuitive and therefor not very practical, and aiming and firing hitscan weapons becomes more difficult too because you have to take the cl_timenudge value into account and lead (or even trail) your targets.
cg_noprojectiletrail
- Enables and Disables smoke from rockets
scr_conspeed
- Changes speed of the Console. Maximum working number is "999".
cg_draw3dicons
- changes default 3D HUD icons (weapon, ammo, head) and puts instead of them 2d.
cg_centertime
- varies the number of seconds of center printed messages that block your visibility. All kind of messages eg. "You fragged xxx";"xxx joined xx team"; and other. "/cg_centertime 0" removes the messages completelly
cg_lagometer
- Enables and Disabled a animation in your HUD that shows your connection smoothness
name
- Changes your ingame name
xp_aspectRatio
- Fixes the aspect ratio of the HUD and HUD elements if the video ratio is not 4:3, for example if you use seta r_customaspect "1".
.
xp_colors
- Set
xp_corpse
- Controls corpses' behaviour
- Bitmask: 1- fade dead bodys into dark; 2 - fade frozen bodys of enemy team into dark; 3 - filter dead bodys
xp_country
- Set your country "GB" EN" "LT" etc.
xp_crosshairColor
- Changes your Crosshair color
xp_delagDemo
- Delags followed players on demos, so you can know better what was the player seing locally
xp_delagWeapons
- Bitmask: 1- Machinegun; 2 - Shotgun; 4 - Lightning; 8 - Railgun
xp_drawClientNum
- Shows clients numbers near by name
- Bitmask: 1- Chats; 2 - Obituary; 4 - Tourney scoreboard
xp_drawMouse
- Mouse cursor on the scoreboard which allows to choose players to spectate
xp_drawMVDWindow
- Toggles on/off the secondary window drawing on mvd playback
xp_drawNames
- Draws names of player when you point to him(only valid while demo or for team members)
xp_drawNotify
- Controls printing information on screen
- Bitmask: -1- use old (engine) notify; 0 - disabled; 1- draw chat; 2 - draw frags; 4 - draw killstreaks; 8 - everything else
xp_drawPing
- Shows your ping ploter
xp_drawScores
- Shows Scores as a part of your HUD
xp_drawSpeed
- Shows your Speed as a part of your HUD
xp_drawStats
- Shows your stats in your HUD
xp_drawTime
- Shows game time in your HUD
xp_drawWeaponSelect
- When you choose a weapon either by bind either by mouse scrolling by using the command it shows the Weapon grid and which weapon you selected
xp_enemyColors
- Changes color of all enemy models, "2112" numbers represents four colors
xp_enemyModel
- Changes all enemy models to the one you choose
xp_gunFov
xp_hud
- Enables and Disables your HUD (there are 1 to 7 presets)
xp_name
- same as /name , but uses special excessiveplus codes for font
xp_noBlink
- Enables and Disables fancy names blinking
xp_noBobbing
- Bitmask: 1- disables weapon bobbing animation; 2 - disables weapon switch animation; 4 - disables weapon firing knockback animation; 8 - disables damage kick
xp_noChatBeep
- Enables and Disables console chat beeps
xp_noMip
- Disables /r_picmip cvar for this functions(bitmask): 1 - Lightning bolt; 2 - Plasma projectile and explosion; 4 - Rocket explosion; 8 - Grenade explosion; 16 - Bullet explosion; 32 - Rail trail; 64 - BFG explosion; 128 - Blood explosion; 256 - Smoke puff; 512 - Shadow marks; 1024 - Wall marks
xp_noParticles
- improves perfomance of rocket and grenade explosions
xp_noRadioChat
- Enables and Disables radio voice chat sounds
xp_noShotgunTrail
- Enables and Disables shotgun trail ingame
xp_noSnow
- Enables and Disables Snow Animation ingame
xp_noVoiceChat
- Enables and Disables Voice Chat ingame
xp_oldGrenade
- Enables and Disables the new Grenade to the old one
xp_oldHitSound
- value of 0 enables damage-based hit tones; 1...5 - different hit tones
xp_oldScoreboard
- old style scoreboard(v1.16...v1.31?)
xp_onExit
- Put here a command, that will be executed on exit
xp_recordMessage
- Enables or disables on-screen demo recording message
xp_screenshotDefault
- Changes the default format of screenshot name, see below for the format:
$(rdate) 1999-12-02
$(date) 02-12-1999
$(time) 18-00-59
$(gametype) ffa, single, 1on1, tdm, ctf, rtf, 1fctf, ca, ftag, ptl
$(map) q3dm2
$(address) localhost-27960
$(servername) My-excessive-server
$(name) ExcessivePlayer
$(team) free, red, blue, spec
$(otherteam) none, red, blue
$(teamname) none, g_blueTeam, g_redTeam
$(otherteamname) none, g_blueTeam, g_redTeam
$(redteamname) g_redTeam
$(blueteamname) g_blueTeam
xp_specModel
- Enables or disables own model for spectating player
xp_startrecordDefault
- Changes the default format of record name, see below for the format:
$(rdate) 1999-12-02
$(date) 02-12-1999
$(time) 18-00-59
$(gametype) ffa, single, 1on1, tdm, ctf, rtf, 1fctf, ca, ftag, ptl
$(map) q3dm2
$(address) localhost-27960
$(servername) My-excessive-server
$(name) ExcessivePlayer
$(team) free, red, blue, spec
$(otherteam) none, red, blue
$(teamname) none, g_blueTeam, g_redTeam
$(otherteamname) none, g_blueTeam, g_redTeam
$(redteamname) g_redTeam
$(blueteamname) g_blueTeam
xp_teamSounds
- Bitmask: 0 - disabled; 1 - ctf sounds; 2 - score sounds
vid_restart
- Restarts video in your Quake 3 Client to successfully save changed settings or simply if you changed gamma or picmip.
Command list
away
- Moves you to "away" mode in Spectators List. Once you join back any team your kills and score will not be reset to 0 but will remain same as when you used "/away". Time will be you pre-away time + all the time you where away
+vstr, -vstr
- Executes a variable command
countries, locations
- These commands show you what Countries/locations are other players in.
drop
- drops weapon or item.
echo2
- same as /echo , but works for xp_drawNotify
help
- Shows you a list of available help
hud
- Customizable user ingame interface(health,armor bars,weapons,etc.)
ignore, mute
- Ignores or Mutes a concrete Player. To ignore or mute someone look up there ID by pressing TAB and the ID number. Works like -> "/ignore 0" or "/mute 0". 0 is just a example.
invite
- Invite someone to the locked team
joinword
- Join password to a locked team
lock
- Lock a team
messagemodeXP
- value of 1 - /say; 2 - /say_team; 3 - /say_spec
motd
- MOTD or "Message of the day". With "/motd" you can see the Message of the day on server
notready
- during a tournament or after a match this command sets your status as not read
players
- shows players network settings in console
ready
- during a tournament or after a match this command sets your status as ready
ref, referee
- command to be referee(refereePassword must be set on server)
say_spec
- by "/say_spec" only spectators can see what you say.
say_team
- by "/say_team" only your team-mates can see what you say.
scores
- shows scores
screenshotXP
- Makes screenshot.Use /screenshotXP [ <tga | jpeg> [ <format> ] ] - > also see xp_screenshotDefault
xp_screenshotDefault
- can take arguments like $(rdate) $(time) $(map) $(servername), and in config looks like seta xp_screenshotDefault "$(rdate)_$(time)_$(map)", will name it screenshot image with date time map name
speconly
- turn on spectator mode
startmvd
- starts recording public multiview demo(MVD), demo from all players in server
startrecord
- starts recording one following player demo
stats
- shows you your stats
stopmvd
- Stops MVD
teamready
- sets ready status to all members in team
timein
- same as ready then taken timeout
timeout
- stops, pauses game-play for a certain time
unignore, unmute
- removes ignore or mute on a player you have ignored or muted. To un-ignore or unmute someone look up there ID by pressing TAB and the ID number. Works like -> "/unignore 0" or "/unmute 0". 0 is just a example.
unlock
- unlock team if it was locked
wallhack
- works for rcon only in spectators mode
weaplast
- Added in Excessive Plus v1.0 (Mar 24 2004).Now removed
Communication
Excessive Plus has several features to improve your communication with your teammates, or just to spam on servers.
Chat Variables
There are some variables available that can be used in the normal, team or private chat messages.
$(health)
Current health.
$(armor)
Current Armor.
$(ammo)
Current ammunition for the currently held weapon.
$(location)
Returns the closest item spawn (only weapons, armors, powerups, holdable powerups and mega health). If there is no item spawn close to you, it will return the location as visible on the team overlay.
$(corpse)
The location you last died at.
$(attacker)
The player name who last hit you.
$(target)
The player name you last hit.
$(pickup)
The last item you took (only weapons, armors, powerups, holdable powerups and mega health).
$(item)
Like $(location) but reports only available items (no empty spawns) and includes dropped items.
$(itemCrosshair)
If there are more than one item close to you and you want to report about a specific item to your team. This will return the item closer to your crosshair.
$(friend)
The closest available team mate. Obviously only works for team games.
Examples:
/say_team Need support at $(location)! [H:$(health) A:$(armor)]
/say Next time I kill you, $(attacker)!!
/say Run while you can $(target)!
/say_team &gen_giveammo.wav Give me some ammo, $(friend)
Voice Chat
These are normal chat messages that additionally replay a sound to get the attention of other players. The sounds will vary depending on the sex of your model. You can colorize the following messages:
cover me
escort me
follow me
good shot
haha
i will hold this position
move
no
ok
take over this position
Usage: /say ^1Ha^3Ha
Radio Chat
These are normal team chat messages that additionally replay a sound to get the attention of your teammates. As with voice chats, the sound will depend on the sex of you model. You can colorize the following messages:
attack now
available tech
base is clear
base is overrun
cancel that
enemy fc is here
fall back and regroup
good work team
i have the quad
incoming attack
incoming quad
need defense
need escort
on defense
on offense
out of position
quad is up
ready
requesting base status
roger
standby to attack
waiting for the quad
Usage: /say_team Base is ^1OVERRUN
NOTE: Version 2.0a of Excessive Plus has a bug that disables radio chats and instead replays voice chats for both normal and team chats.
Q3F Radio Chat
These are the more complex type to set up. Basically, you can bind certain sounds with whatever message you want, being it normal, team or even private messages. The list of available sound files to replay are:
&def_depdisp.wav         Dispenser deployed.
&def_deppipe.wav         Pipe trap deployed.
&def_depsen.wav          Sentry deployed.
&def_dropflag.wav        Defend the dropped flag.
&def_fixsenty.wav        Repair our sentries.
&def_flag.wav            Defend our flag!
&def_flagdanger.wav      The flag is in danger.
&def_flagprimexit.wav    Flag outgoing primary exit.
&def_flagsafe.wav        Base secure.
&def_flagsecexit.wav     Flag outgoing secondary exit.
&def_iam.wav             I'm defending.
&def_incflag1.wav        Incoming flag.
&def_incflag2.wav        They're coming for the flag!
&def_incprimrte.wav      Incoming primary route.
&def_incsecrte.wav       Incoming secondary route.
&def_needsupp.wav        Requesting support.
&def_obj.wav             Defend the objective.
&def_wpt.wav             Defend the waypoint.
&gen_anytime.wav         Any time.
&gen_ceasefire.wav       Cease fire.
&gen_firehole.wav        Fire in the hole!
&gen_giveammo.wav        Give me some ammo.
&gen_gogogo.wav          Go go go!
&gen_goodbye1.wav        Goodbye.
&gen_goodbye2.wav        Goodbye.
&gen_halt.wav            Halt!
&gen_hello1.wav          Hello!
&gen_hello2.wav          Hello.
&gen_inpos.wav           In position.
&gen_isbasesec.wav       Is our base secure?
&gen_moveout.wav         Move out.
&gen_movepls.wav         Move please.
&gen_no1.wav             No.
&gen_no2.wav             No.
&gen_noprob.wav          No problem.
&gen_objcplt.wav         Objective complete.
&gen_objfld.wav          Objective failed.
&gen_oops.wav            Oops.
&gen_pass.wav            Pass.
&gen_reportin.wav        Report in.
&gen_sorry.wav           Sorry.
&gen_stop.wav            Stop!
&gen_unlucky.wav         Unlucky.
&gen_wait.wav            Wait.
&gen_waitord.wav         Awaiting orders.
&gen_watchfire.wav       Watch your fire.
&gen_yes1.wav            Yes.
&gen_yes2.wav            Yes.
&off_attobj.wav          Attack the objective.
&off_attsentry.wav       Attack the enemy sentry.
&off_attwpt.wav          Attack the waypoint.
&off_carrsupp.wav        Our flag carrier needs support.
&off_coverme.wav         Cover me.
&off_defhvy.wav          Enemy defense heavy.
&off_deflight.wav        The enemy defense is light.
&off_dephe.wav           Heavy explosive deployed.
&off_flagget.wav         Get the enemy flag.
&off_flaggive.wav        Give me the flag.
&off_flaghave.wav        I have the enemy flag.
&off_flagtake.wav        Take the flag from me.
&off_imatt.wav           I'm attacking.
&off_needsupp.wav        I need reinforcements!
&off_spotpipe.wav        Pipe spotted.
&off_spotsen.wav         Sentry spotted.
&tap_alright.wav         All right.
&tap_aw.wav              Awww.
&tap_goaway.wav          Go away.
&tap_goodgame1.wav       Good game.
&tap_goodgame2.wav       Great game.
&tap_myflag1.wav         My flag.
&tap_myflag2.wav         My flag, you can't have it.
&tap_nicecapture1.wav    Nice capture.
&tap_nicecapture2.wav    Nice capture.
&tap_nicemove1.wav       Nice move!
&tap_nicemove2.wav       Nice move!
&tap_niceshot.wav        Nice shot.
&tap_sneakybastard.wav   You sneaky bastard.
&tap_thatsucks1.wav      That sucks!
&tap_thatsucks2.wav      That sucks!
&tap_thegreatest.wav     We're the greatest!
&tap_wellplayed1.wav     Well played.
&tap_wellplayed2.wav     Well played!
&tap_werock1.wav         We rock!
&tap_werock2.wav         We rock!
&tap_yourmine.wav        You're mine!
&tap_yourock.wav         You rock!
Usage: /say &tap_sneakybastard.wav You sneaky bastard!
Disabling messages
You can disable all of these fancy features with the client cvars xp_noVoiceChat for voice chats, or xp_noRadioChat for radio chats. Use xp_noChatBeep to disable the chatbeep coming after each message.
However, if you don't want to disable them, but there is a chat spammer on the server you would like to ignore, you can use the /ignore (alias /mute) client command. This command accepts one parameter, which can be:
- The ID of the client you want (you can see this ID printed on the scoreboard, or in the output of the
/playerscommand). - The string
red,blueorspecto mute all members of the specified team. - The string
allto mute everyone in the server.
Mutes will stay for the session. You can add something like unmute all to the xp_onExit cvar to unmute them at the end of the map.
Alternatively, to mute everyone on the server, you can just disable the printing of chat messages, by setting the right bits on the xp_drawNotify client cvar.
Demos
Simple demos
Excessiveplus demos are recorded and played from excessiveplus\demos directory.
Config below contains example key binds for recording demos and useful while playing them.
If you like it you can just copy and paste it into your own config file.
This config uses arrow keys so change them if these keys are already used in your config.
// DEMO PLAYER™ by Shudder

bind UPARROW "vstr recX"            //record / stop record
bind DOWNARROW "timescale 0"        //pause demo
bind RIGHTARROW "+vstr time3 time2" //play (fast forward x3 when pressed)
bind LEFTARROW "+vstr time1 time0"  //slow x2 (x10 when pressed)
bind END "vstr mvdX"                //record / stop MVD

set recX "vstr recON"
set recON "startrecord; set recX vstr recOFF"
set recOFF "stoprecord; set recX vstr recON"

set mvdX "vstr mvdON"
set mvdON "startMVD; set mvdX vstr mvdOFF"
set mvdOFF "stopMVD; set mvdX vstr mvdON"

set time0 "timescale 0.5"
set time1 "timescale 0.1"
set time2 "timescale 1.0"
set time3 "timescale 3.0"

seta xp_startrecordDefault "$(name)_$(rdate)_$(time)_$(map)_$(servername)"
//Demo will be named using variables

seta sv_fps 125
//When recording demo on localhost you need to put your com_maxfps value here
//for smooth playback.
To watch a demo from file you have a few options:
1) place it in your excessiveplus\demos folder, start Q3 and run it from menu (DEMOS).
2) use external program to run it for you with double click like seismovision or other (?)
3) use simple batch file to open .dm_68 file type:
@echo off
cd /D %0\..
copy %1 "excessiveplus\demos\temp.dm_68" /Y
start quake3.exe +set fs_game excessiveplus +timescale 0 +demo temp.dm_68
Multi view demos (MVD)
Those demos are best for FWs or CWs. Recording makes one huge demo with all playing clients on server (while watching you can change and spectate everyone you like, like in real game).
Ref's and rcon's can make mvd's as they want and need, even if MVDs are forbiden for clients by server admins. In example config shown above you can record MVDs with END key.
...
Make avi videos in Quake3
Shortly: Record simple demo. Convert it to tga frames. Merge them to avi, using free software.
Convert the Q3 demo to .tga frames, make sure you have enough free diskspace, a long demo can easily eat up a few GB of data. Bring down the console and type: cl_avidemo 25, to record in 25 fps.
Start recording frames for you Quake 3 video, by typing demo demo1
Sit back and relax while the frames are beeing rendered. Setting cl_avidemo 0 will make demos run normal again.
When it's done, quit Quake 3 and you should find your recorded frames in the "\screenshots" directory as .tga files.
note: Quake 3 will output images in the same size as your Q3 screen resolution, a tip to speed up frame rendering of your video is to set it to low, for example 320x240.
Marge your frames into an .avi video
Download this freeware program:
pjBmp2Avi.zip or check out Quake Video Maker if you wanna make more advanced movies.
- Start "pjBmp2Avi.exe" and select the path to your demo's screenshots folder in the directory field.
For example: "\screenshots".
- Change the file option from BMP to TGA. Now you should see a list of all the screenshots in the "files" field.
- Go to "Output"-options and select path and name of the avi you wish to create.
For example: "c:\film_time\my_quake_3_movie.avi"
- Click the create button. An select a video codec when prompted, click OK and the program will compile your .tga files to an avi.
- Poke your Orb action figure in the eye, practice sweeping moves with you mouse or come up with any other fun way to spend your time while your Quake 3 avi video is compiling. The window closes (hopefully) and you're done! Grab some snacks and sit back and watch your first Quake 3 movie!
Q3 avi making by Fredrik Olsson 05-08-06 20:38,
Thanks to Bluehair on Doom3Files for suggesting Quake Video Maker
HUDs
Under construction.
You can highly customize the appearance of your HUD by the so called hud files.
The /hud your_hud_name command will load the file excessiveplus/hud/your_hud_name.cfg.
Note: There is the special default hud to disable the whole customizable HUDs.
So the command /hud default will disable and fallback to the default hud defined in the code.
To get your preferred HUD loaded automatically you can set the xp_hud variable in your config file.
Note that the /hud command will also set this variable for you.
Check out the great SuperHud Editor. It provides a visual editor, reducing the creation of a new HUD to a few mouse clicks.
Syntax
The syntax has been derived from CPMA, so most HUDs should load just fine.
# single-line comment
// single-line comment
/* multi-line comment */

NetGraph {
	rect 592 432 48 48
	bgcolor 0.25 0.25 0.25 0.25
	fill
}

NetGraph { rect 592 432 48 48; bgcolor 0.25 0.25 0.25 0.25; fill; }
Differences
There are some differences compared to CPMA.
- All elements are optional. Loading an empty file will result in an empty screen.
In contrast, CPMA draws some elements even if not defined, probably the most noticeable one would be
Console. - We have a flexible z-layer. Elements defined first will be drawn first, thus
PreDecorateandPostDecorateare just the same.If you run into problems with your existing HUDs and overlapped elements, just change the order.
Such fixed HUDs will load fine in both Excessive Plus and CPMA. - Elements can be defined multiple times and each appearance will be drawn. For example you can display your health two or even ten times all over the screen, if you fear the death.
- Several elements can be disabled by the default variables like
cg_drawFPS, even theDraw3Dproperty can be overwritten by/set cg_draw3dIcons 0.Of course you can only toggle the display if the element is actually defined by the hud file. If there is no
FPSdefined, you cannot display the FPS with/set cg_drawFPS 1. - We have new properties not available for CPMA, namely:
Anchors,ParamandVerticalBar.
Properties
Note: All sizes, positions and drawing is done in an virtual 640x480 box and then scaled to your actual screen resolution.
Anchors FlagsDefines to which directions the element will be anchored relative to the drawn screen. This property will be applied when
xp_aspectRatiois enabled, which allows the HUD to not look stretched on non-4:3 resolutions. The possible flags are:1top
2right
4bottom
8leftFlags can be combined. For example, the default value of
15(which is 8 + 4 + 2 + 1) will anchor the element in all directions, which means that CPMA HUDs will look stretched, just like ifxp_aspectRatiois disabled.Angles Pitch Yaw Roll [ Pan | -Rotate ]Used to alter the display of a
Model. The fourth value is optional, if given it will either pan or rotate the model, depending on the algebraic sign (positive or negative).BGColor Red Green Blue AlphaDefines the background color for the element, valid values are
0..1. In combination withRectandFillthis will fill the area with the color.Color Red Green Blue AlphaorColor T | EDefines the foreground color for the element, valid values are
0..1. Icons andImageproperties will use this color.There are two special colors
TandE, they will represent the colorsredorbluedepending on your current team.Note: Define
BGColorto control the alpha of these special colors.DoubleBar [ 0 | 1 ]Makes the elements
StatusBar_ArmorBar,StatusBar_AmmoBarandStatusBar_HealthBaruse two lines instead of one.Note: If optional parameter is omitted it will default to
1.Draw3D [ 0 | 1 ]Will force the display of a 3d model. This can be overwritten by
/set cg_draw3dIcons 0Note: If optional parameter is omitted it will default to
1.Fade Red Green Blue AlphaIf both
FadeandTimeare defined, the element will linearly fade fromColorto this.Fill [ 0 | 1 ]Will fill the area defined by
RectwithBGColor.Note: If optional parameter is omitted it will default to
1.Font fontnameDefines the font for an element. If omitted
xpwill be used.xpis the default Excessive Plus font
numberssupports only numbers, no letters
uiis the font used by Quake 3 UI
baseq3will use the old Quake 3 fontCompatibility mode:
cpma,sansmanwill bexpwithTextStyle 4(lite)
idblockwill benumbers
idwill bebaseq3
threewavewill bebaseq3withTextStyle 8(outline)Any other fonts will output a warning and the default font will be used instead.
Note: It is highly suggested to use font
xpfor elements that can contain player names, because Excessive Plus allows highly customized names with bold/lite styles and special characters not present in other fonts.FontSize PointSizeorFontSize Width HeightThe default Excessive Plus font is already aspect-adjusted and generally looks best if you just specify the
PointSize. It is suggested to use a distinctWidthandHeightfor all other fonts, withHeightbeing 25-50% larger thenWidth.Note: Negative values can be used to create mirrored text.
Image "path/to/image_or_shader"Displays the image in the area defined by
Rect. You can use any image or shader available in a PK3. IfColoris present, it will colorize the image.This can also be used to load a skin for a
Model, just point the path to a .skin file.Note: On a
sv_pureenabled server you can only use images available in the PK3s the server provide.Model "path/to/model.md3"Displays a 3d model in the area defined by
Rect. A specific skin can be loaded for that model with theImage "path/to/skin_name.skin"property.Monospace [ 0 | 1 ]By default, all fonts are proportionally spaced. Meaning that an "i" takes up less room than an "m". Use this to get the old Quake 3 behaviour but generally this is not suggested.
Note: If optional parameter is omitted it will default to
1.Offset X Y ZChanges the offset of a
Modelalong the X Y Z axis.Param Value1 [ Value2 [ Value3 [ Value4 ] ] ]Up to four special parameters for some elements.
Rect X Y Width HeightDefines the position and size of an element.
Note: Elements and especially
Imagecan be mirrored using negativeWidthorHeightvalues.Text "some text here"Will output the text in the area defined by
Rect. Currently only supported byPreDecorateandPostDecorate.TextAlign L | C | RJustify the text either left, centered or right within
Rect.Note: In combination with some elements, this will define the element's position rather then it's text.
TextStyle Flags1text will have a drop shadow
2ignores inline color codes and forces color defined by theColorproperty
4forces a text to be "lite". Only works in combination with thexpfont
8text will have an outline shadowFlags can be combined e.g.
TextStyle 6will be 4 (lite) + 2 (force color).Time IntervalDefines how long the element will be displayed in milliseconds.
VerticalBar [ 0 | 1 ]Makes the elements
StatusBar_ArmorBar,StatusBar_AmmoBarandStatusBar_HealthBarbe vertical instead of horizontal.Note: If optional parameter is omitted it will default to
1.
Elements
!DefaultThis is a helper element and will not be drawn. Once defined, all followed elements will inherit properties from this element. You can reuse this element as often as you want.
PreDecorateandPostDecorateEmpty elements that can be used to draw decoration like separator bars, static
Text, images etc.Note: Because HUDs have a dynamic z-layer, both elements are the same and are just there for compatibility reasons. The draw order is defined by appearance order in the file.
AmmoMessage"LOW AMMO WARNING" and "OUT OF AMMO" message. Display can be toggled by
cg_drawAmmoWarning.AttackerIconIcon of the player who last attacked you.
Timecan be used.AttackerNameName of the player who last attacked you.
Timecan be used.Chat1tillChat8Display up to eight lines of player chats.
Timecan be used.Note: This can prepend the client number, depending on
xp_drawClientNum.ConsoleReplacement for the engine notify console.
Timecan be used. Display can be toggled withxp_drawNotify.FlagStatus_NMEStatus of the enemy flag in CTF gametypes.
Note: Use
Color Eto get aredorblueflag, depending on your current team.FlagStatus_OWNStatus of your own flag in CTF gametypes.
Note: Use
Color Tto get aredorblueflag, depending on your current team.FollowMessage"Following <PlayerName>" message. Obviously will only display when following a player while spectating.
FPSFrames per second. Can be toggled by
cg_drawFPS.FragMessage"You fragged <PlayerName>" message.
Timecan be used.GameTimeDisplays the game timer. Can be toggled by
cg_drawTimer.Note: The last 60 seconds will display milliseconds while overtime will change color to cyan.
GameTypeDisplays the current gametype like "Freeze Tag" while spectating or during warmups.
ItemPickupName of the item you've just picked up.
Timecan be used.ItemPickupIconIcon of the item you've just picked up.
TimeandDraw3Dcan be used.NetGraphDisplays your net graph or lag-o-meter. Can be toggled by
cg_lagometer.NetGraphPingDisplays your current ping, based on the net graph. Can be toggled by
xp_drawPing.PlayerSpeedYour current speed on the X-Y-axis in units per second. Can be toggled by
xp_drawSpeed.Powerup1_IcontillPowerup4_IconPowerup icons.
Draw3Dcan be used.Note: CTF gametypes will display the flag in
Powerup1_Iconwhile you hold it.Powerup1_TimetillPowerup4_TimePowerup time left in seconds.
RankMessage"1st place with 12" message.
Timecan be used.Score_LimitFraglimit, Roundlimit or Capturelimit. Can be toggled by
xp_drawScores.Score_NMEEnemy score. Can be toggled with
xp_drawScores.Note: Use
Color Ein combination withFillto get aredorbluebackground, depending on your current team.Score_OWNYour score. Can be toggled with
xp_drawScores.Note: Use
Color Tin combination withFillto get aredorbluebackground, depending on your current team.SpecMessageHelp message for spectators, explaining the keys or informing about your thaw status in Freeze Tag.
StatusBar_AmmoBar,StatusBar_ArmorBar,StatusBar_HealthBarCurrent ammo/armor/health in bar form. For a single bar, it will get full when it reaches the hard limit.
DoubleBarcan be used to get two lines instead of one, representing the soft and hard limits.TextAlignwill change the alignment of the whole bar andImagecan be used to customize it even further. Can be toggled bycg_drawStatus.This element accepts an additional
Param, which can be a combination of the following flags:
1single bar will behave like the second bar ofDoubleBar
2single bar will get full when it reaches the soft instead of hard limit
Combining those flags on different bars can achieve some fancy effects. Seehud/qlive_snippet.cfgfor an example.Note: If
Coloralpha is 0, flexible color will be used.Redfor critical,orange/yellowfor normal andwhitefor over limit values.StatusBar_AmmoCount,StatusBar_ArmorCount,StatusBar_HealthCountCurrent ammo/armor/health in numeric form. Flexible colors are enforced. Can be toggled by
cg_drawStatus.StatusBar_AmmoIcon,StatusBar_ArmorIcon,StatusBar_HealthIconCurrent ammo/armor/player icon.
Draw3Dcan be used. Can be toggled bycg_drawStatus.Note: If both
ImageandModelis ommited inStatusBar_HealthIcon, your current model will be used.TargetNameCurrent crosshair target's name. Can be toggled by
cg_drawCrosshairNames.TargetStatusCurrent crosshair target's status, only available for team members. Can be toggled by
cg_drawCrosshairNames.TeamCount_NMEPlayers alive on enemy team, only for Freeze Tag and Clan Arena. Can be toggled by
xp_drawScores.TeamCount_OWNPlayers alive on your team, only for Freeze Tag and Clan Arena. Can be toggled by
xp_drawScores.TeamIcon_NMEDefaults to
red/blueSarge icon, depending on your team. You can use anyImageorModel.TeamIcon_OWNDefaults to
red/blueSarge icon, depending on your team. You can use anyImageorModel.Team1tillTeam8Teamoverlay for up to 8 team members. Can be toggled by
cg_drawTeamOverlay.TextStylewill change alignment for the whole element.Note: The column design will be kept, no matter if
Monospaceis set or not. Generally it will look better without.VoteMessageWorldCurrent vote text.
Note: Votes can be called at the end of a map, while the scoreboard is displayed. A position should be taken to work for both, in-game and scoreboard.
WarmupInfo"Waiting for players", "Warmup", "Starts in: X" etc.
WeaponListThe weapon list has some special settings that differ from the rest.
The
WidthandHeightare for each weapon, not the total.
TextStylecan be used to have a horizontal or vertical weapon list.
Colordefines the color for your current selected weapon andFillwill show ammo for weapons you do not have.Note: The list will wrap at the bottom of the screen for both vertical styles. This way you can get a multi-column list.
Matchmode
Under construction.
Names
In Excessive Plus you can use extended control characters to have colored names with special effects.
The main idea was taken from the popular mod 'OSP'.
The easiest way to create colored names is to use XP Qname 2.0 found here credits to  and all who helped make it, for a quick recap on how to set it up read comment 127 by
Of course, you can disable all effects by using xp_noBlink.
Characters
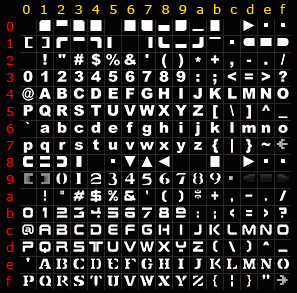
From the Character table, you can use different fonts and other characters to make unique names (tags).
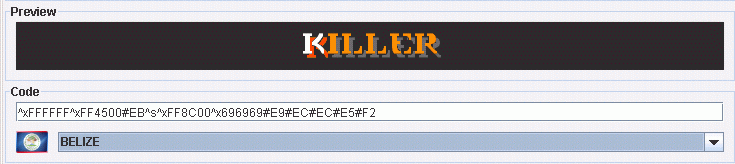
For example, both of these codes will produce the word WASP in a different way:

#D7#C1#D3#D0
/seta xp_name "#D7#C1#D3#D0"

#F7#E1#F3#F0
/seta xp_name "#F7#E1#F3#F0"
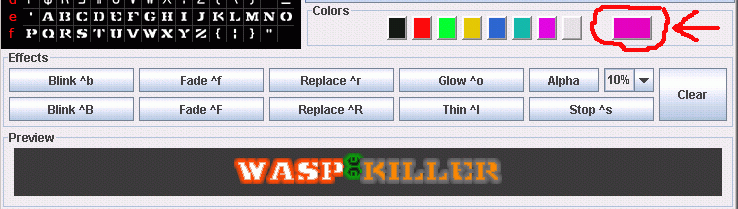
Colors
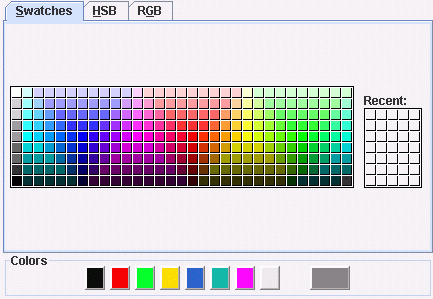
To have a colored name you can use the the basic Color line, or the more sophisticated Swatch, HSB, and RBG Tabs, or manually paste hex color codes from your favorite color picker/photo editor into the Code line.
Example, using the basic Color line (8 colors only) would produce the following code:
^0 - makes a text black.
^1 - makes a text red.
^2 - makes a text green.
^3 - makes a text yellow.
^4 - makes a text blue.
^5 - makes a text aqua.
^6 - makes a text fuchsia.
^7 - makes a text white.
So ^1WASP will become  and
and ^1W^2A^3S^4P will become  .
.
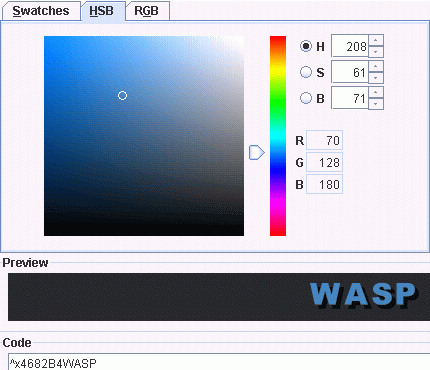
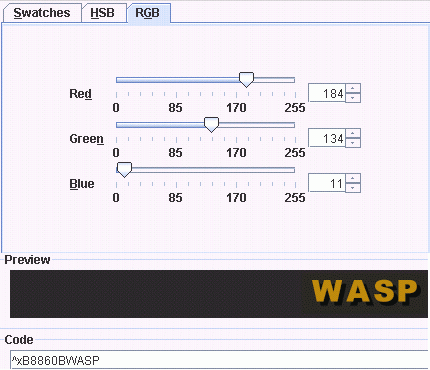
The HSB (Hue, Saturation, Brightness) and the RBG (Red, Green Blue) tabs allow you to have exact colors (examples, SteelBlue via the HSB tab and DarkGoldenRod via the RGB tab).
Effects
The Effects section includes several text altering attributes like blinking, fading, glowing and others.

Blinking
To make text blink select the effect button or use:
^b - makes a text blink at the first half.
^B - makes a text blink at the last half.
For example ^bte^Bst will become  .
.
Fading
To fade text select the effect button or use:
^f - will fade out a text and fade in again.
^F - will fade in a text and fade out again.
For example ^fte^Fst will become  .
.
Replacing
To replace text select the effect button or use:
^r - makes a text display at the first half.
^R - makes a text display at the last half.
For example ^rte^Rst will become  .
.
Foreground and Background Colors
You can improve the appearance of your name (tag) by using Foreground and Background Colors.
Simply place two (2) consecutive colors followed by text or symbols.
The text/symbol will use the 1st color (the foreground color) and the 2nd color (the background color) will be a shadow outline.
Hint: Look up the concept of Color Opposites to improve your efforts. If you use a program like Photoshop or the Gimp you can select the inverse of your color to have a background that will compliment your foreground color.
For example:

/seta xp_name "^7^1#C4#CD#DA^s^0^1#88^s^7^1#8D^s^0^4#F0#F2#E5#E4#E1#F4#EF#F2"
Glowing Text
You can add a glowing effect to your name (tag) for that Alien effect by using ^o or selecting the effect button.
For example, here is the name tag above with Glow on the player name:

/seta xp_name "^7^1#C4#CD#DA^s^0^1#88^s^7^1#8D^s^0^4^o#F0#F2#E5#E4#E1#F4#EF#F2"
Thin Text
If you are using lots of Capital letters, you may find it useful to use the Thin effect to reduce the width of your name (tag). To invoke the Thin effect use ^l or select the effect button.
For example, here is the name tag above with the Thin effect on everything:

/seta xp_name "^7^1^l#C4#CD#DA^s^0^1^o^l#88^s^7^1^l#8D^s^0^4^o^l#F0#F2#E5#E4#E1#F4#EF#F2"
Alpha Blending
To alter the transparency of text or symbols select the effect button or use:
^a1 - makes a text 10% visible.
^a2 - makes a text 20% visible.
^a3 - makes a text 30% visible.
^a4 - makes a text 40% visible.
^a5 - makes a text 50% visible.
^a6 - makes a text 60% visible.
^a7 - makes a text 70% visible.
^a8 - makes a text 80% visible.
^a9 - makes a text 90% visible.
For example ^a2t^a4e^a6s^a8t will become  .
.
Team Colors
While there is no button for this option, you can have your name change colors depending on your team:
^t - will be replaced by your current team color.
For example te^ts^7t will become on team blue  , team red
  ,
,
as spectator  and anything else
  .
.
Stop all Effects
To stop all effects from continuing past a certain point select the effect button or use:
^s - stops all effects.
Examples

/seta xp_name "^r^1^4*^R^4^1*^s ^f^0^7POLICE ^s^r^4^1*^R^1^4*"

/seta xp_name "^r^f^x77C818apple^xA5CC76juice^s^R^f^x2C7EE4blue^x76A9E7shift"

/seta xp_name "^0^r#1B#13#02#14^R#0A#08#1E#14^s^3test^0^r#12#02#13#1B^R#12#1E#08#0A"
xp_noBlink
To add via the console type: /set xp_noBlink 0
To add manually to your config: seta xp_noBlink "0"
Disables all fancy name effects, where:
0 = xp_noBlink is disabled
1 = xp_noBlink will disable all effects.
2 = xp_noBlink will disable all effects and draw everything in white color.
3 = xp_noBlink will disable all effects, draw all names in white color and make the console text also white.
E+ 1.03 Name Tag Conversion
If you played the previous version of Excessive Plus (version 1.03) you will notice that your name Tag does not display correctly anymore.
However, there is an easy way to make it compatable with Excessive Plus 2.0a. Simply copy the entire line from your old configuration to a new text file. Remember to save the file with a .cfg extension. Then, from XP Qname, CLICK "File" then "Open" and locate your config file.
For example, here is an old name tag about to be converted to E+ 2.0a style.

Here is the converted tag in Xp Qname.
Either copy and paste the converted code or save the new code and optionally a Country Flag into a new config file. To do so, simply CLICK "File" then "Save or Save As" depending on whether you want to overwrite the original config or create a new config file.
Here is the resulting config file with the new tag and country flag.

Note that E+ 2.0a uses a new client variable (cvar) "xp_name" instead of the old Q3 cvar "name". Consequently, if you later decide to edit the file, remember to modify the line with "seta xp_name" not "seta name".
Also, if you open an old name tag and the result is garbage then use a different text editor. My preferred editor "NotePad++" often had problems but Xint and EditPad Lite worked fine.
GIF and Preview Options
You can toggle the Preview between "16x16" and "32x32" sizes. To do this, CLICK "Options" and select the size that you wish to display.
Note, this only affects Preview and Saved Gif files. It will not change how your name tag displays in Quake III or OpenArena.
The name tags below are the same. The one of the left was displayed in 16x16 preview and the one on the right was displayed in 32x32 preview.

![]()

Besides toggling the Preview size, you can change the Preview and Saved GIF quality by CLICKING "Options" then "Gif Quality" and selecting the quality. Please note that you can also change the background of the Saved GIF either before or after you have entered the code. The background will not show up in the Preview but it will in the Saved GIF.
To save your name tag as a GIF, CLICK "File" then "Save As GIF".
The name tag on the left was saved as a 16x16 GIF and the one on the right was saved as a 32x32 GIF.

![]()

The 1st image below shows the button in XP Qname which will indicate the background color of your Saved GIF. Note, the Preview background did not change. The 2nd image shows the Saved GIF.

==============================================================================
Document Name: XP Qname HTML User Guide v1.1
Author: WaspKiller
Date: January 2010
Notes: This document used the format and some text
and images from the E+ 1.03 Qname User Guide.
==============================================================================